

You pull a favorite Japanese knife from the block, and the tomato slides sideways instead of slicing. Nothing looks wrong with the blade. It simply stopped biting, and the pull-through gadget in the drawer feels like the wrong tool for something this thin and hard.
That instinct is right. Learning how to sharpen a Japanese knife takes a flat stone, a steady hand, and a little patience, and it is far less mysterious than it sounds. This guide walks through the stones, the angle, and the motion, so your first session ends with a clean edge instead of a scratched blade.
What You Need Before You Start
Choosing Your Stones
Most home sharpeners begin with a combination stone, often 1000 grit on one side and 3000 to 6000 on the other. The coarse side rebuilds the edge, and the fine side polishes it. Think of it as a simple whetstone grit guide: 200 to 400 grit repairs damage, 800 to 1000 grit handles regular sharpening, and 3000 grit and above refines the finish.
Stone choice matters more than most beginners expect, so it helps to compare a few options for a whetstone for Japanese knives before you buy. Hardness, grit, and soaking requirements all vary from one stone to the next.
Setting Up Your Station
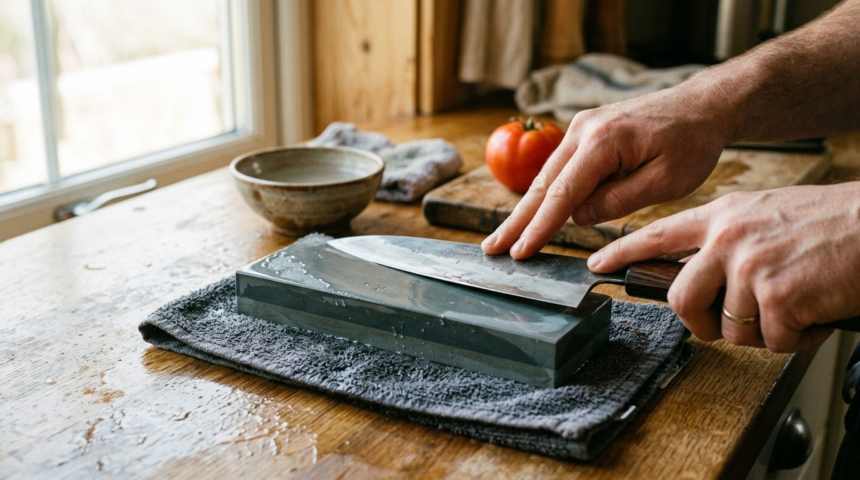
Place a damp towel under the stone so it cannot slide, and keep a bowl of water within reach. Some stones need a soak until bubbles stop rising, while others only need a splash, so check the maker’s instructions first. A stone that has dipped in the middle should be flattened before you start, because a hollow surface changes your angle.

Work at a comfortable height with your elbow relaxed. Good posture makes a steady angle much easier to hold.
Finding and Holding the Right Angle
Why the Angle Matters
Many double-bevel Japanese knives are sharpened at roughly 10 to 15 degrees per side, which is narrower than a typical Western blade. That narrow Japanese knife sharpening angle is what lets these knives cut with so little resistance. Holding it consistently matters far more than pressing hard.
Geometry varies between knives, so check the maker’s recommendation when you can. If you are unsure what your knife was ground to, follow the existing bevel instead of guessing a number.
A Simple Way to Feel It
Lay the blade flat on the stone, then lift the spine slowly until the cutting edge sits snug against the surface. That small lift is close to the angle you want. Keep your wrist locked and move from the shoulder rather than flicking the hand.
A permanent marker makes the process visible. Color the edge, take a few light strokes, and look at where the ink disappears. If it wears away evenly along the bevel, your angle is on target.
The Sharpening Motion, Step by Step
Raise a Burr on the Coarse Stone
Use light pressure and push the blade away from you along the stone, keeping the angle steady. Cover the whole edge, from heel to tip, with overlapping strokes. After several passes, check the opposite side for a burr, a tiny raised lip of metal, by gliding a fingertip from the spine toward the edge, never along it.
Once you feel the burr along the full length, flip the knife and repeat on the other side. The burr tells you the stone has reached the very edge of the blade.
Refine on the Fine Stone
Move to the finer stone and use lighter strokes with fewer passes. Alternate sides until the burr is gone, then finish with a few feather-light strokes on each side. Harder steels may simply need more passes, which is normal and not a sign that something went wrong.
Rinse the knife, dry it immediately, and test the edge on a sheet of paper or a ripe tomato. A clean edge should slice without tearing or pressing.
Special Cases Worth Knowing About
Single Bevel Knives
Traditional blades such as a yanagiba or deba are ground on one side only. When you sharpen a single bevel knife, the angled face does nearly all of the work on the stone, and the flat back needs only a very light pass to remove the burr. Grinding the back too aggressively changes the geometry that makes the knife cut the way it does.
When to Hand It Off
A chipped tip, a deep nick, or a blade that needs reprofiling can take hours on a stone and is easy to make worse. In those cases, handing the knife to a specialist who sharpens by hand on water stones is a sensible alternative to risking a knife you love.
There is no shame in this. Even experienced home sharpeners send out their most valued blades when the damage goes beyond a routine touch-up.
Keeping the Edge Between Sessions
Wipe the blade after each use, store it in a sheath or on a magnetic strip away from other metal, and keep it out of the dishwasher. Regular touch-ups on a fine stone beat occasional heavy sessions, because you are only refreshing the edge rather than rebuilding it.
Once you know how to sharpen a Japanese knife, the job becomes a quiet ten-minute habit instead of a chore. For damage beyond a touch-up, a sharpening service that works by hand on water stones can restore the edge. Your cutting board, and your tomatoes, will notice the difference.
What is the first knife you would trust to a whetstone, and which part of the process worries you most?